How to Make Homemade Gluten-Free Potato Skins
If you appreciate the allure of crispy, cheesy snacks but require a gluten-free option, homemade gluten-free baked potato skins are your ideal answer. These delightful morsels not only quell your cravings but also offer the opportunity to personalize flavors with your preferred toppings such as cheese and bacon.
Uncover the advantages of crafting them from scratch, the essential ingredients you’ll need, and a comprehensive guide that walks you through the preparation of these delectable gluten-free potato treats. You’ll also find expert tips on serving and storing your culinary masterpieces, including make-ahead options.
Prepare to dazzle your family and friends with this effortlessly gourmet, gluten-free appetizer!
Discover why making your own gluten-free potato skins is a game changer for your snack game!
Contents
- Key Takeaways:
- What are Gluten-Free Potato Skins?
- Why Make Homemade Gluten-Free Potato Skins?
- What Ingredients Do You Need to Make Delicious Gluten-Free Potato Skins?
- How Do You Make Gluten-Free Potato Skins?
- Step 5: Baking the Potato Skins
- How to Serve and Store Gluten-Free Potato Skins?
- Your Questions About Potato Skins Answered!
- 1. What ingredients do I need to make homemade gluten-free potato skins?
- 2. Can I use regular potatoes for this recipe?
- 3. How do I make sure my potato skins are gluten-free?
- 4. How do I prepare the potatoes for the skins?
- 5. Can I make these potato skins dairy-free?
- 6. How do I store leftover potato skins?
- 7. Can I make these potato skins vegan?
- 8. What are some healthy cooking methods for potato skins?
Key Takeaways:
- Homemade gluten-free potato skins are a delicious and nutritious snack that everyone can enjoy, regardless of dietary restrictions.
- Making your own potato skins allows you to control the ingredients and tailor them to your preferences, all while saving money compared to buying pre-made versions.
- The key to making perfect gluten-free potato skins lies in choosing the right type of russet potatoes, cheese variety, and toppings like fresh chives, and following a few key steps in the preparation and cooking process.
What are Gluten-Free Potato Skins?
Gluten-free potato skins present a delicious and versatile option, crafted from hollowed-out russet potatoes that are baked to a perfect crisp and adorned with an array of flavorful toppings. These delightful appetizers are designed for those with celiac disease, a condition where people cannot eat gluten without getting sick, ensuring that everyone can savor the essence of savory comfort food without straying from their dietary needs.
The journey begins with the careful preparation of gluten-free potato skins. This makes it possible for even those with celiac disease to indulge in this exquisite treat. Whether you’re hosting a game day gathering or seeking an effortless appetizer, these potato skins are not only a crowd-pleaser but also a canvas for customization to suit your unique tastes.
Why Make Homemade Gluten-Free Potato Skins?
Creating homemade gluten-free potato skins presents a unique opportunity to craft a snack that is not only delicious but also healthier than any store-bought option.
When you take the reins in the kitchen, you gain control over the quality of ingredients, ensuring your dish is free from preservatives and bursting with flavor. By incorporating fresh ingredients like extra virgin olive oil, garlic powder, and your favorite cheese varieties, you can whip up loaded potato skins that cater to a variety of taste preferences while proudly maintaining their gluten-free status.
Making them at home is also a cost-effective choice; it transforms cooking into an enjoyable and rewarding experience.
What Are the Benefits of Making Homemade Gluten-Free Potato Skins?
The benefits of making your own homemade gluten-free potato skins are truly remarkable. Not only can you select healthier ingredients, but you also gain the advantage of customizing them to fit your unique tastes and dietary needs.
By crafting your potato skins, you can ensure that they are made with gluten-free ingredients, putting your mind at ease if you or someone you love has celiac disease. You have the freedom to experiment with an array of toppings, whether it’s perfectly melted cheese, crispy bacon bits, or even a dairy-free option using plant milk and healthy nutritional yeast. Additionally, learn how to make gluten-free potato chips for a delicious snack that everyone can enjoy.
This allows you to explore flavors that tantalize your palate while keeping health in check. Taking a personal approach means you can adjust cooking times and temperatures to achieve the texture you desire whether you prefer them extra crispy or soft with a creamy center.
The versatility of potato skins means they can effortlessly accommodate a range of dietary preferences. For example, you might swap traditional sour cream for a vegan-friendly alternative or throw in some roasted vegetables for an added nutrient boost, creating a more balanced dish. This not only enhances the flavor but also opens the door to options like a loaded veggie skin, perfect for those who seek healthier choices without compromising on taste.
Now, get ready to impress! Your taste buds will thank you!
What Ingredients Do You Need to Make Delicious Gluten-Free Potato Skins?
To make delicious gluten-free potato skins, start with a selection of premium ingredients that enhance both flavor and texture while adhering to gluten-free standards.
The star of the show is the russet potato, celebrated for its robust skin and fluffy interior, providing an ideal foundation for your loaded potato skins.
Elevate your creation by incorporating ingredients such as rich cheese, savory bacon bits, and fresh garnishes like chives or spring onions. For a healthier twist that accommodates various dietary preferences, explore dairy-free cheese alternatives like nutritional yeast or plant-based milk.
What Types of Potatoes Can Be Used?
When crafting gluten-free potato skins, the russet potato reigns supreme. Its starchy texture crisps up beautifully when baked, making it a go-to choice. However, you can also explore other varieties like Yukon gold or red potatoes. Each type offers unique flavors and textures that can elevate your potato skins to new heights.
Every type of potato brings distinct characteristics to the table, allowing you to experiment and discover your personal favorites. For instance, Yukon gold potatoes provide a creamy, buttery flavor that enhances the taste of the skins while maintaining a slightly waxy texture that holds up well during cooking.
In contrast, red potatoes offer a firmer, less starchy consistency, delivering a delightful chewiness that some may find particularly enjoyable. As you choose your potato variety, consider not only your texture preferences but also how the flavor aligns with your intended toppings.
If you’re in the mood for a heartier experience, russet is your best bet. On the other hand, those seeking a richer taste might gravitate toward Yukon gold.
Ultimately, exploring different potato types allows for a personalized approach to crafting your ideal stuffed potato skins.
What Types of Cheese Can Be Used?
When selecting the right cheese for your gluten-free potato skins, you’ll find a fantastic variety of options to choose from, each enhancing the flavor and overall enjoyment of this delectable dish.
Different cheese types bring unique benefits and flavors that truly shine when melted. For example, mozzarella offers a delightful stretchy, gooey quality that pairs perfectly with crispy potato skins, while gouda adds a subtle sweetness and smooth texture that elevates the experience.
Experiment with a blend of sharp cheddar cheese and mild cheeses to create a more intricate flavor profile, tantalizing your taste buds with each delightful bite. If you prefer a dairy-free option, vegan cheese can be a fantastic substitute; when combined with nutritional yeast, it delivers a cheesy essence that closely resembles the original.
This approach caters to vegan or lactose-intolerant diners and infuses the dish with a delightful umami flavor, which refers to a savory taste that many find appealing, ensuring satisfaction for everyone at the table.
What Types of Toppings Can be Used?
Get ready for a delicious transformation! The toppings you select for your gluten-free potato skins can dramatically elevate their appeal and flavor, offering a delightful array of combinations to satisfy any culinary preference.
Classic choices like crispy bacon bits and a dollop of sour cream introduce richness and texture. Fresh ingredients such as spring onion and chives add a vibrant splash of color and freshness. Feel free to experiment with healthier alternatives, like black beans or a sprinkle of paprika and garlic powder, crafting a uniquely loaded potatoes experience that caters to diverse tastes.
If you re in the mood for a gourmet twist, consider options like roasted garlic or creamy avocado slices that provide a satisfying base. Adding shredded cheese whether it s sharp cheddar or zesty pepper jack not only intensifies the flavor but also ensures an irresistibly melty finish that s hard to resist.
For those seeking a little heat, jalape os or a drizzle of sriracha can take the dish to the next level. Meanwhile, fresh cilantro introduces a refreshing herbaceous note that balances the flavors beautifully. If you’re after a heartier version, topping your potato skins with grilled chicken or quinoa can transform this dish into a fulfilling meal, appealing to the health-conscious without compromising on taste.
How Do You Make Gluten-Free Potato Skins?
Creating gluten-free potato skins is a delightful and uncomplicated endeavor that transforms ordinary russet potatoes into crispy, flavorful treats perfect for any occasion. Start by preheating the oven to achieve that coveted crunchy texture.
As you scoop out the potato flesh to make room for your favorite cheese and toppings, like cheddar cheese and bacon bits, you have the freedom to customize each skin to your taste. With the right balance of baking time and temperature, you ll emerge with deliciously crispy potato skins that are both satisfying and fulfilling ideal for game day or as a savory comfort food appetizer.
Step 1: Preparing the Potatoes
To create gluten-free potato skins, start by selecting and preparing the perfect russet potatoes, which will give you that ideal texture you crave. Begin by preheating the oven to the desired cooking temperature; this step is key to achieving that perfect crunch!
Once the oven is ready, wash the potatoes thoroughly to remove any dirt, then dry them off. You ll then cut them in half lengthwise, creating two potato halves that will serve as the perfect canvas for your toppings.
Handle the potatoes with care to avoid any bruising; you want to maintain the strength of those skins. After drying, grab a sharp knife and cut along the length of the potatoes, applying even pressure for smooth, clean edges.
To achieve extra crispiness, consider scooping out a small portion of the flesh from each half. This little adjustment not only enhances texture but also creates more room for your delectable fillings, such as mashed potato filling or a variety of cheese toppings.
Once you ve made the cuts, lightly coat the insides with olive oil and season them with salt and pepper. This way, every bite will be bursting with flavor before they head into the oven.
Step 2: Scooping out the Potato Flesh
Once you’ve prepared the potatoes, the next step is to carefully scoop out the potato flesh from the halves, leaving just a thin layer intact to preserve the skins’ strength. This step is vital for achieving that perfect balance between crispy skins and a soft, flavorful filling.
With a spoon or a melon baller in hand, gently extract the potato flesh, ensuring you don t puncture the skin. This will help your baked potato skins hold up beautifully during the cooking process.
To refine your scooping technique, try using a gentle twisting motion to minimize the risk of tearing the delicate skin. A smaller spoon or scoop can also provide more precision, allowing you to navigate around the edges with ease.
Once you ve removed the flesh, don t toss it aside just yet; it can be transformed into creamy mashed potatoes or served as a base for hearty dishes like potato soup or casseroles. You can even create a dairy-free version by using plant milk and dairy-free cheese. This not only reduces waste but also adds an extra layer of flavor and texture to your meals, ensuring you make the most of every part of the potato.
Try out these recipes and share your experiences!
Step 3: Preparing the Potato Skins
Preparing the potato skins is key to achieving that coveted crispy texture. You can easily do this by brushing them with extra virgin olive oil and seasoning them with garlic powder and paprika. After scooping out the flesh, place the potato halves skin-side up on a baking sheet. Drizzle them generously with olive oil, ensuring that the skins are evenly coated.
The seasoning will elevate the flavor of your crispy potato skins, transforming them into a mouthwatering appetizer or an easy game day snack that s sure to impress.
Taking the time to ensure even distribution of oil and seasonings is crucial; it allows for uniform cooking and maximizes that delightful crunch.
In addition to garlic powder and paprika, feel free to explore other flavor profiles such as:
- Sea salt
- Black pepper
- A sprinkle of grated Parmesan for that cheesy twist
Incorporating herbs like rosemary or thyme will infuse the skins with a delightful aroma. Meanwhile, spices like cayenne pepper can add a kick for those who appreciate a little heat. If you’re making a homemade vegan version, try using nutritional yeast or vegan cheese. These chosen seasoning blends not only deepen the taste but also elevate the overall eating experience to new heights.
Step 4: Adding Cheese and Toppings
After you’ve prepared the potato skins, it’s time to elevate them with cheese and your favorite toppings, transforming them into loaded potato skins that are bursting with flavor. Start by generously sprinkling cheese over each potato skin, allowing it to melt beautifully during the baking process.
Then, layer on additional toppings like crispy bacon bits, hearty black beans, or a sprinkle of fresh chives. Customize each skin to your liking for an unforgettable savory comfort food snack experience.
To achieve the perfect balance, consider a mix of flavors and textures that complement the warm, gooey cheese. For instance, a dollop of sour cream or a splash of salsa can introduce a creamy and zesty element that enhances the overall profile. If you’re feeling adventurous, chopped jalape os can add a spicy kick, while avocado slices or spring onion provide a cool, creamy contrast.
Keep in mind the all-important ratio of toppings to cheese. Too many toppings can overshadow the dish, leading to a less enjoyable experience. The goal is to create a harmonious blend that highlights the melted cheese while delivering a delightful crunch and burst of flavor in every bite.
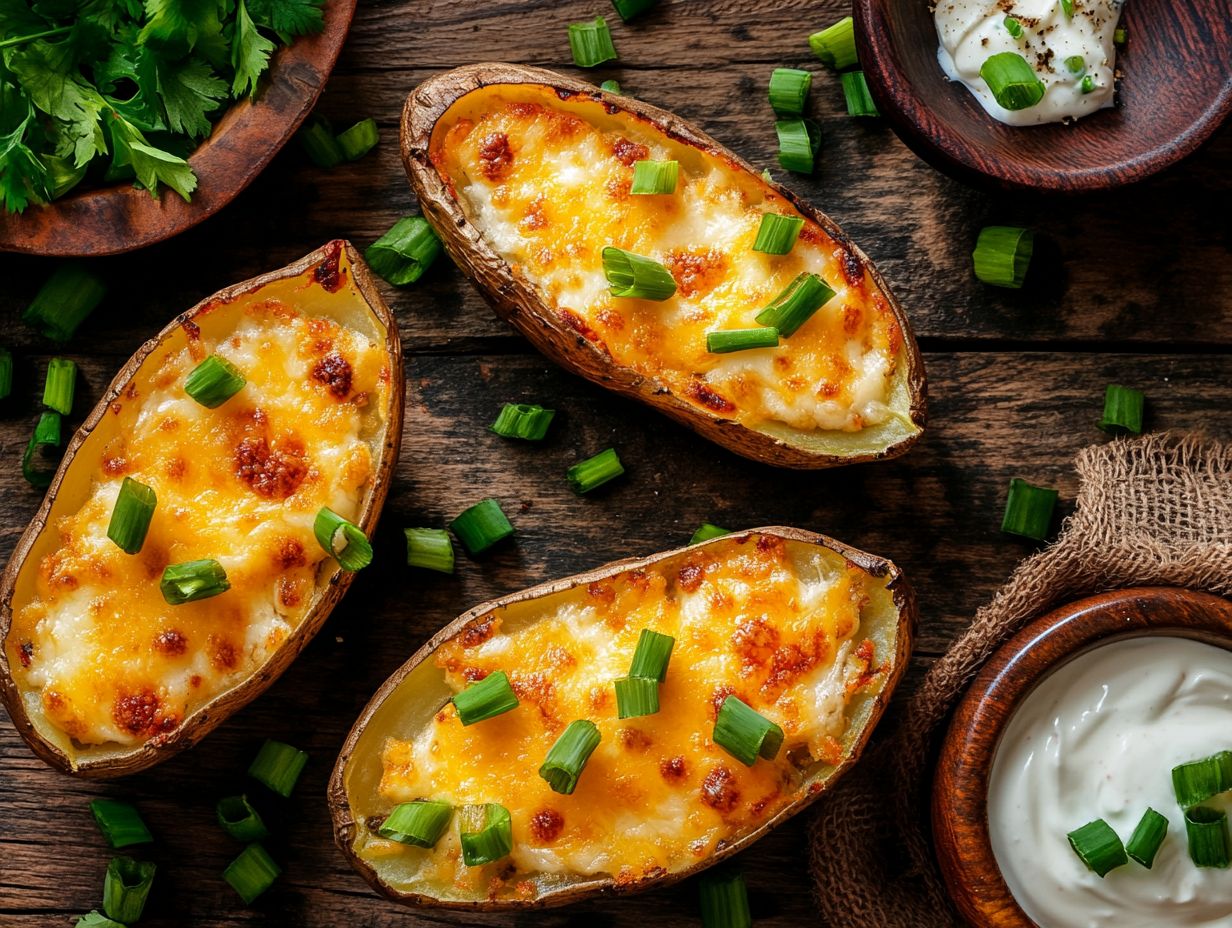
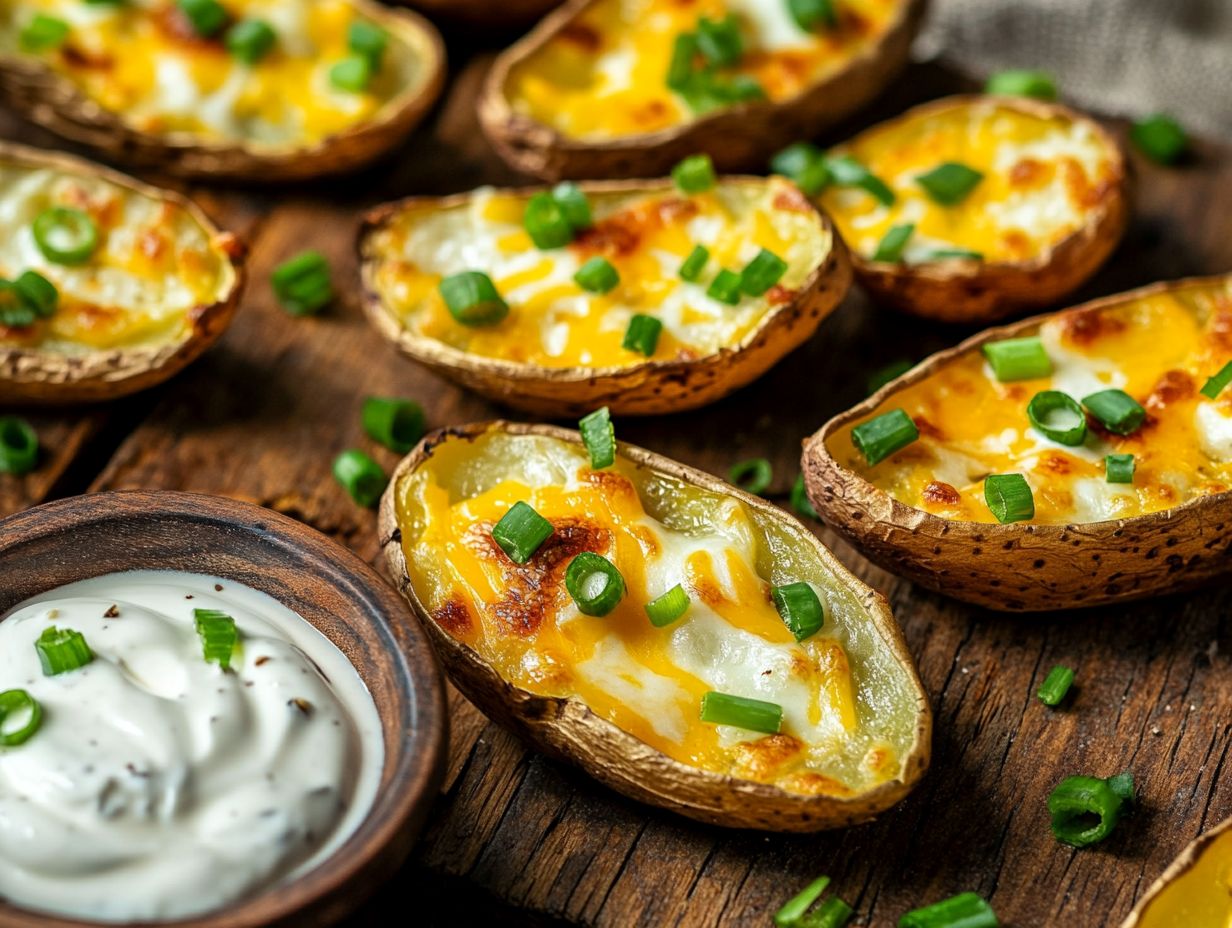
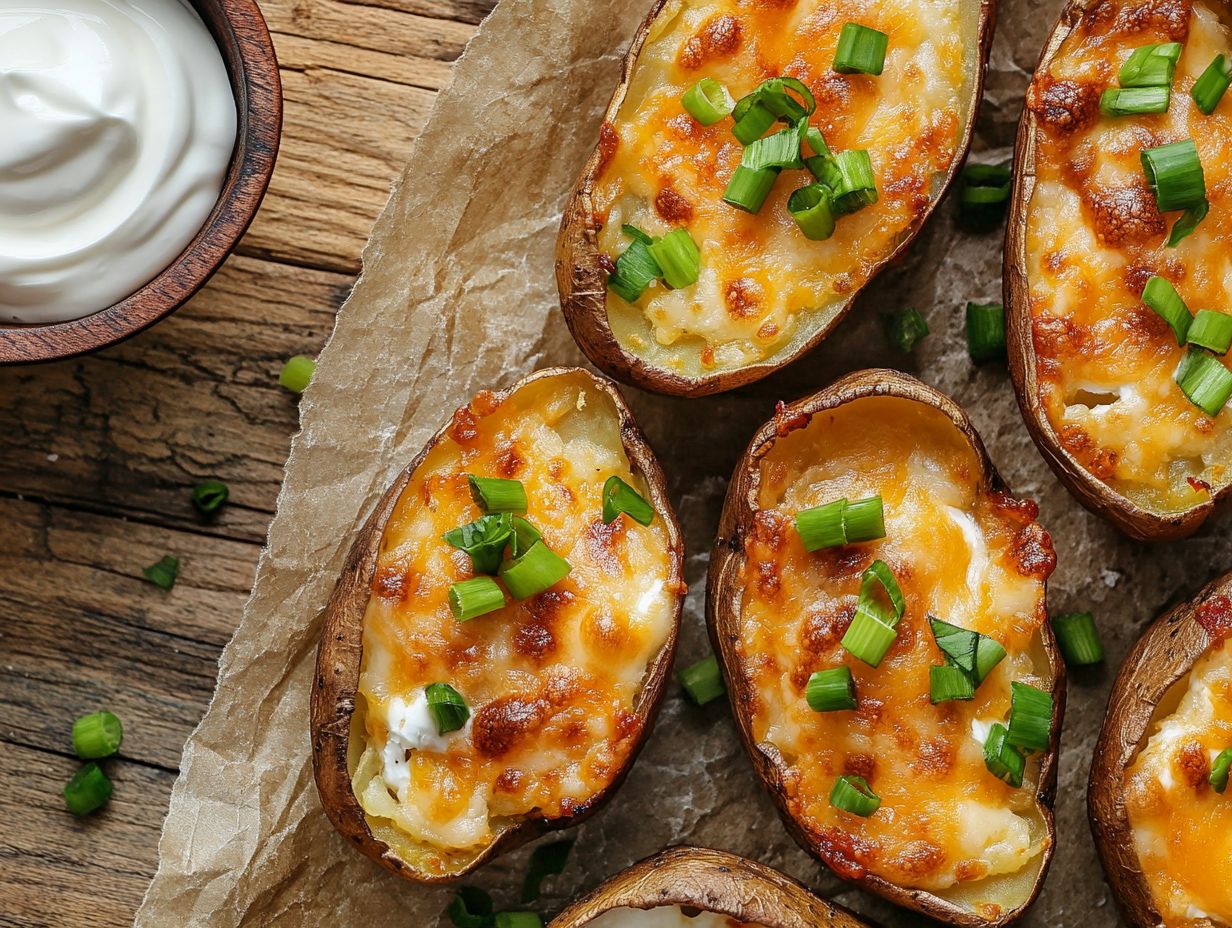
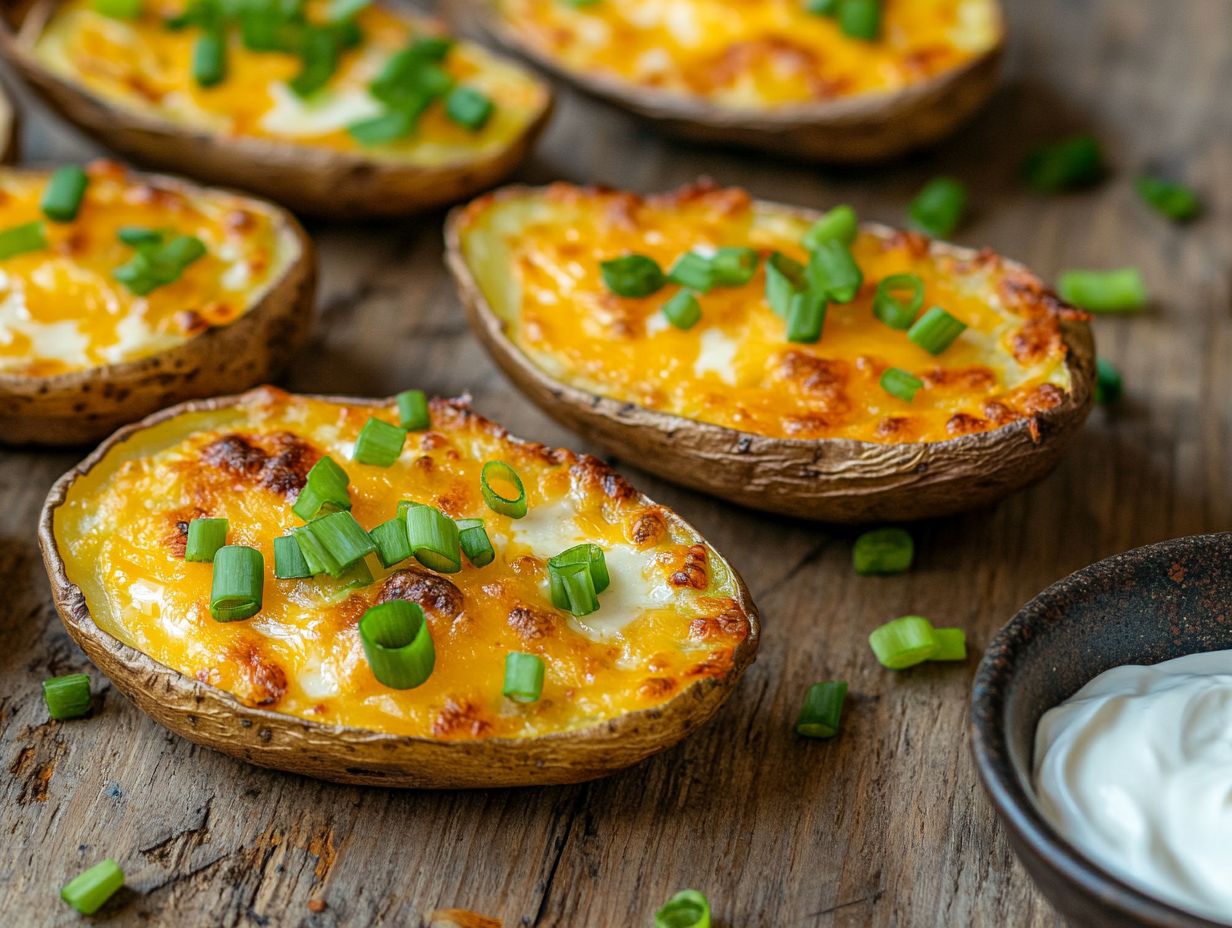
Step 5: Baking the Potato Skins
Baking the potato skins is the final touch in crafting the ultimate gluten-free appetizer. It’s crucial that you keep a close eye on the cooking time for impeccable results.
Begin by preheating your oven. Arrange the prepared potato skins on a baking sheet, ensuring they have enough space between them for hot air to circulate. Bake the stuffed potato skins until the cheese is beautifully melted and the edges of the potato skins turn a delightful golden brown and crispy. This usually takes about 15-20 minutes, depending on your oven’s specific temperature settings.
For the best texture, set your oven to 400 F (200 C). During the last few minutes of baking, pay special attention to the skins to achieve that perfect level of crunch. A good sign that they re done is a rich golden hue, accompanied by a satisfying crunch when you gently press them with a spatula. This baking method ensures that your loaded potato skins are crispy on the outside and perfectly cooked on the inside.
If you spot any uneven browning, consider rotating the baking sheet halfway through; this simple adjustment can significantly enhance how evenly the heat is distributed across all the skins, leading to that coveted crunchy exterior.
How to Serve and Store Gluten-Free Potato Skins?
Serving gluten-free potato skins is truly a pleasurable experience. These delicious morsels can effortlessly transition from a delightful game day snack to an enticing appetizer for your gatherings.
Once you’ve baked the potato skins to achieve that coveted crispy perfection, present them hot out of the oven with an array of dipping sauces think sour cream or guacamole to undoubtedly impress your guests.
Properly storing them is crucial for keeping their delicious flavor and texture intact! This allows you to savor this comforting treat long after the initial meal has concluded.
Can They Be Made Ahead of Time?
Absolutely, gluten-free potato skins can be prepared in advance, making them an ideal choice for your gatherings and celebrations. You have the option to get the potato skins and their fillings ready ahead of time, so when it s time to serve, all you need to do is assemble and bake them in a flash. This little kitchen hack allows you to enjoy your homemade loaded potato skins without the frantic last-minute rush, giving you the freedom to focus on enjoying your event.
Start the process by selecting firm, medium-sized russet potatoes. Bake or microwave them until they re tender, then slice them in half and scoop out the insides. Once you ve prepared the skins, you can conveniently store them in a container that closes tightly so air can’t get in in the refrigerator for up to 48 hours.
This not only saves you precious time but also allows the flavors of the toppings to meld beautifully. This fantastic cooking shortcut lets you wow your guests without the last-minute stress!
When it’s nearly time to serve, simply preheat your oven and reheat the potato skins with their toppings for about 15 to 20 minutes at 375 F. This method guarantees they come out crispy and delicious, preserving their quality and taste while you entertain your guests without a hint of stress. This make-ahead approach ensures your homemade loaded potato skins are ready at a moment’s notice.
How to Reheat Leftover Potato Skins?
Reheating those leftover gluten-free potato skins is a breeze, and you have several methods at your disposal to bring back their crispy texture and delightful flavor. The most effective way to reheat them is to use your oven. This method ensures even heating and preserves that satisfying crunch.
Simply preheat the oven, arrange the potato skins on a baking sheet, and let them warm up for about 10-15 minutes. This way, the cheese stays melted, and the skins retain their crispness. If you baked instead of fried them initially, they will maintain a healthier, crispy texture.
If you re in a pinch and prefer a quicker option, the microwave can certainly be utilized, though it may result in a softer texture. To mitigate this, place a paper towel underneath the potato skins to absorb excess moisture and heat them in short intervals. This cooking method is great for a fast, savory snack.
A skillet is also a great option for reheating. It provides direct heat while allowing you to keep a watchful eye, preventing any unfortunate burning.
Whichever method you choose, just remember to avoid reheating for too long to steer clear of sogginess. A light spray of oil can reintroduce some moisture and enhance both flavor and texture, elevating your potato skins to their former glory.
How to Store Leftover Potato Skins?
To store your leftover gluten-free potato skins properly, follow a few straightforward guidelines that will help maintain their delightful flavor and texture, allowing you to savor them later. This method works well for crispy potato skins and loaded potato skins too.
Start by letting the potato skins cool to room temperature before placing them in a container that closes tightly so air can’t get in; this helps prevent any unwanted condensation and sogginess.
Store the container in the refrigerator for up to 3-4 days, ensuring you can easily reheat and indulge in your savory comfort food whenever the craving strikes. For those with gluten sensitivities, this is a safe way to enjoy your treat.
By taking these precautions, your potato skins will retain their delightful crunch and flavor for a longer period. For an extra touch of freshness, consider layering paper towels in the container to soak up any excess moisture. For added flavor, try sprinkling some fresh chives or spring onion on top before storing.
If you want to extend their shelf life even further, freezing is a fantastic option. Wrap the cooled skins tightly in plastic wrap before placing them in a freezer-safe container; they can last for up to three months. Don t forget to label the container with the date so you can keep track of their freshness. This cooking shortcut is especially helpful for busy weeks.
Ready to indulge? Thaw them in the refrigerator overnight for an irresistible snack! Simply reheat in the oven or microwave for a delicious treat. Preheat the oven to ensure they get a nice crispy texture.
Your Questions About Potato Skins Answered!
1. What ingredients do I need to make homemade gluten-free potato skins?
To make gluten-free potato skins, you will need russet potatoes, extra virgin olive oil, salt, and pepper.
Also, choose a gluten-free cheese and any other toppings you like, such as bacon bits, black beans, green onions, or sour cream. For a dairy-free version, try using plant milk and dairy-free cheese.
2. Can I use regular potatoes for this recipe?
Yes, you can use regular potatoes for this recipe. However, if you are following a gluten-free diet, be sure to check the label and choose a brand that is certified gluten-free.
This is particularly important for those with celiac disease.
3. How do I make sure my potato skins are gluten-free?
To ensure your potato skins are gluten-free, use certified gluten-free ingredients. Also, avoid any cross-contamination with gluten-containing ingredients or utensils.
This precaution is crucial for those with gluten sensitivities and celiac disease.
4. How do I prepare the potatoes for the skins?
First, wash and scrub the russet potatoes to remove any dirt. Then, poke holes in the potatoes with a fork or knife and microwave them until tender.
Finally, slice the potatoes in half and scoop out the centers to create the skins. You can use the potato flesh to make creamy mashed potatoes or a filling for stuffed potato skins!
5. Can I make these potato skins dairy-free?
Absolutely! You can make these potato skins dairy-free by using dairy-free cheese and toppings such as avocado, salsa, or dairy-free sour cream alternatives.
For a healthy twist, sprinkle some nutritional yeast for a cheesy flavor!
6. How do I store leftover potato skins?
To store leftover potato skins, let them cool completely. Then, place them in an airtight container in the fridge for up to 3 days.
Don t wait too long! To reheat, preheat the oven to 350 degrees F and heat them for 10-15 minutes until warmed through. This will ensure the cheese topping gets perfectly melted!
7. Can I make these potato skins vegan?
Yes! You can easily make these potato skins vegan by using vegan cheese and plant-based toppings like black beans, fresh chives, and avocado.
8. What are some healthy cooking methods for potato skins?
Bake potato skins instead of frying them for a healthier option. Use a splash of extra virgin olive oil and a sprinkle of nutritional yeast for a delicious health boost!